mxbmrp3
A customizable, open-source HUD plugin for MX Bikes and GP Bikes displaying real-time race information and telemetry.
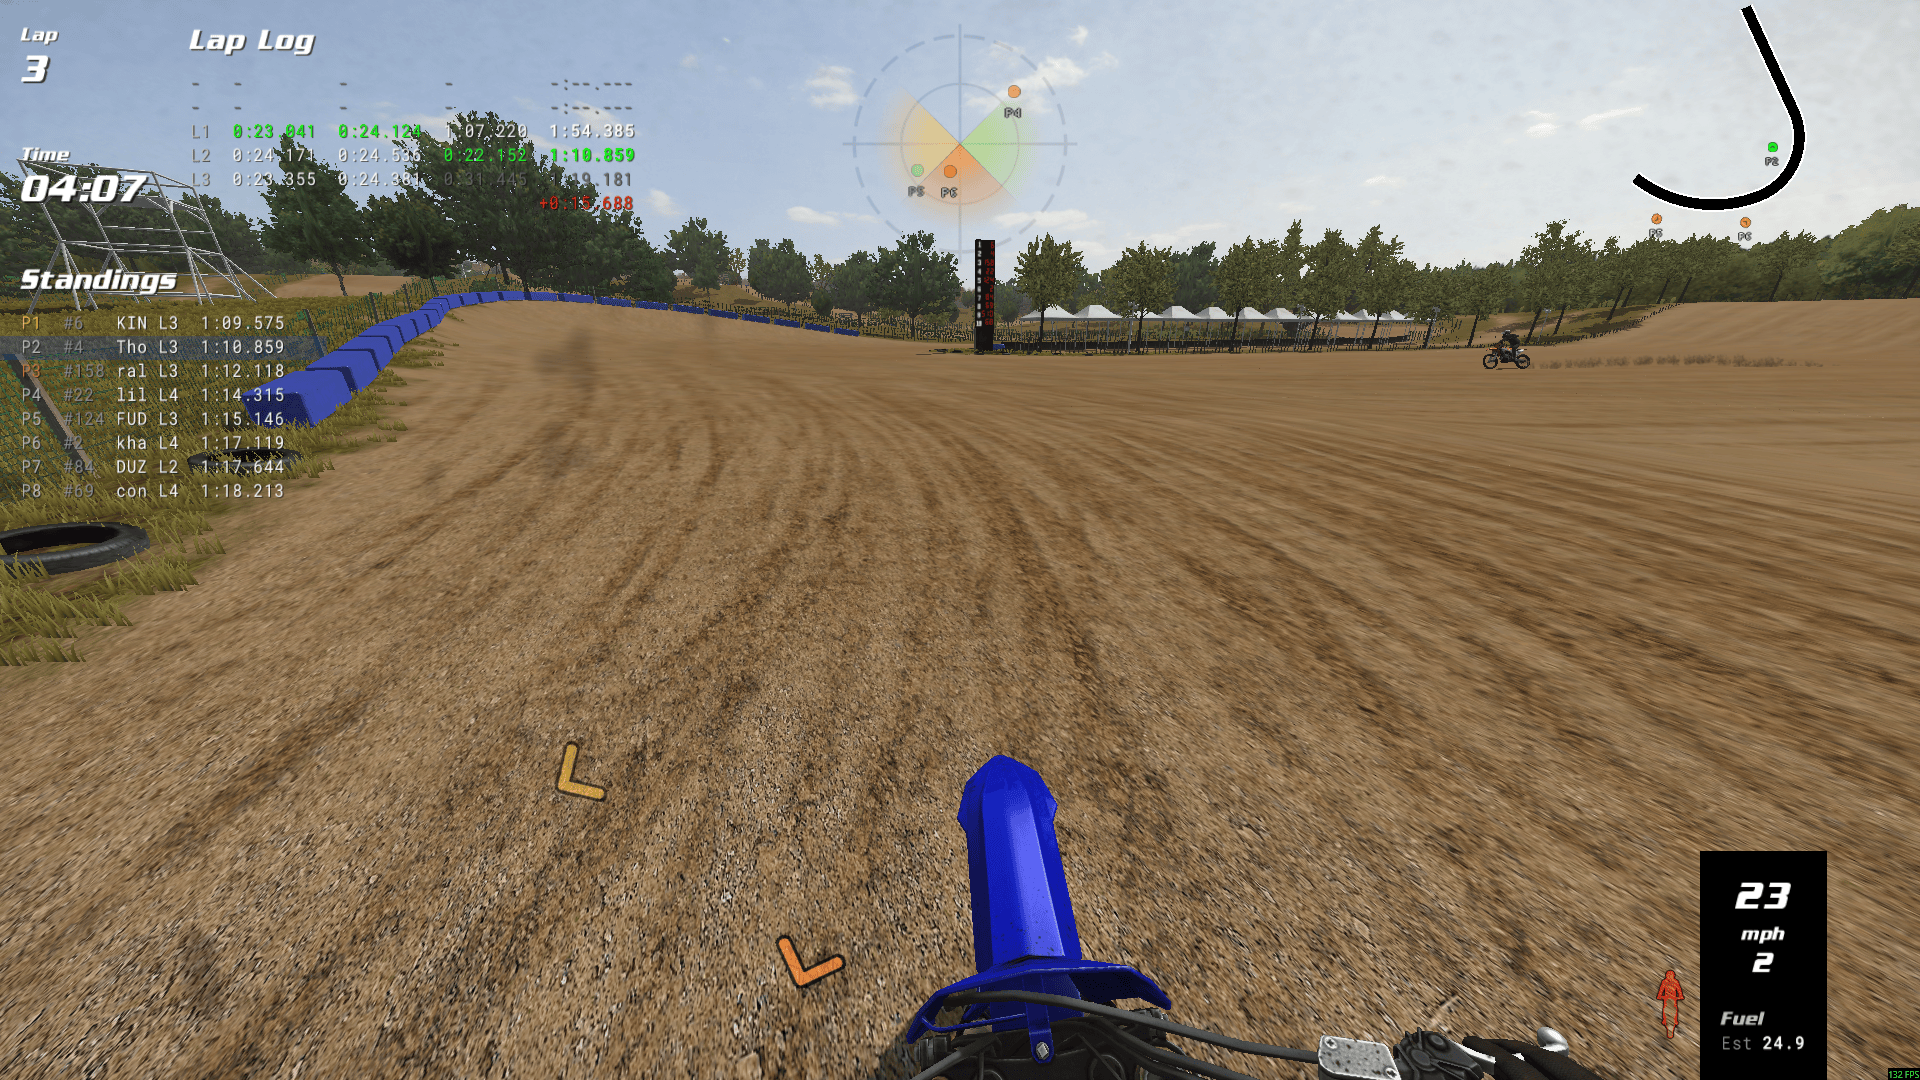 Example HUD layouts. All elements are fully customizable.
Features
- Live race standings, track map, and proximity radar with approach alerts
- Lap timing with splits, personal bests, gap-to-PB visualization, and online lap records (MX Bikes)
- Track specific riders with custom colors and icons across all HUDs
- Controller rumble feedback with customizable effects (bumps, slide, spin, lockup, wheelie, etc.)
- Discord Rich Presence integration showing current session and track
- FMX freestyle trick detection with scoring and chain combos
- Telemetry visualization and compact info widgets
- Drag-and-drop positioning with color themes and customizable hotkeys
- Automatic profile switching for Practice, Qualify, Race, and Spectate sessions
Get Started
Download and install the plugin to begin customizing your HUD.
Quick Start
- Install the plugin
- Launch the game and load a track
- Right-click drag to reposition elements
- Press Tilde or click [=] to customize visibility, scale, opacity, and more
See Installation for detailed setup instructions.
Contents
- Installation
- Controls
- Configuration
- HUDs & Widgets
- Advanced Settings
- Modding
- Troubleshooting
- Development
Installation
Requirements:
- MX Bikes Beta 20 or newer / GP Bikes Beta 18 or newer
Automatic Installation
- Download the latest installer
mxbmrp3-Setup.exe - Run the installer - it will:
- Auto-detect your MX Bikes and GP Bikes installations (Steam or standalone)
- Let you choose which games to install for
- Install to the correct plugins folder for each game
- Handle upgrades automatically (preserves your settings)
Manual Installation
- Download the latest release archive
mxbmrp3.zip - Find your game’s plugins folder:
- Steam: Right-click the game in your library → Manage → Browse local files → open
plugins - Standalone: Navigate to your game installation folder (e.g.,
C:\Games\MX Bikes\orC:\Games\GP Bikes\) → openplugins
- Steam: Right-click the game in your library → Manage → Browse local files → open
- Extract the plugin files:
- Copy
mxbmrp3.dlo(MX Bikes) ormxbmrp3_gpb.dlo(GP Bikes) to theplugins/folder - Copy the
mxbmrp3_data/folder to theplugins/folder
Do NOT delete the existing game files (
proxy64.dlo,proxy_udp64.dlo,xinput64.dli, ortelemetry64.dlofor GP Bikes) - these are native game files, not old plugin versions.Your directory should look like this after installation (files vary slightly by game):
[Game]/ │ mxbikes.exe / gpbikes.exe │ ... │ └───plugins/ ├── mxbmrp3_data/ ← Add this folder (from release) │ ├── fonts/ ← Font files (.fnt) │ ├── textures/ ← Texture files (.tga) │ └── icons/ ← Icon files (.tga) ├── mxbmrp3.dlo ← Add this (MX Bikes only) ├── mxbmrp3_gpb.dlo ← Add this (GP Bikes only) ├── proxy_udp64.dlo ← Keep (native game file) ├── proxy64.dlo ← Keep (native game file) ├── xinput64.dli ← Keep (native game file) └── telemetry64.dlo ← Keep (GP Bikes only) - Copy
After Installation
Launch the game - the plugin will load automatically. Some elements are enabled by default and can be repositioned or configured via the settings menu. If nothing appears, see Troubleshooting.
Controls
Mouse
- Move Mouse - Show cursor and
[=]settings button (auto-hides after inactivity) - Left Click - Interact with settings menu and HUD elements
- Right Click & Drag - Reposition elements
Keyboard Shortcuts
Keyboard and controller hotkeys can be customized in Settings > Hotkeys. By default, only the settings menu hotkey is configured:
- Tilde (below Esc) - Toggle settings menu
Configuration
Use the settings menu (Tilde key or [=] settings button) to configure all HUDs and widgets. Hover over any setting to see its description - all controls have in-game tooltips explaining their function.
The settings menu provides:
- General - Profiles, preferences, grid snapping
- Appearance - Font categories and color theme customization
- Hotkeys - Keyboard and controller bindings
- Riders - Track specific riders with custom colors and icons
- Rumble - Controller vibration feedback effects
- Updates - Check for new versions and install updates in-game
- Individual HUD tabs - Per-element visibility, scale, opacity, and options
All settings are automatically saved between sessions.
Profiles
Four separate profiles store complete HUD layout configurations:
- Practice - Practice and warmup sessions
- Qualify - Pre-qualify, qualify practice, and qualify sessions
- Race - Race 1, Race 2, Straight Rhythm sessions
- Spectate - Spectating or viewing replays
Auto-switch (disabled by default) automatically changes profiles based on session type.
HUDs & Widgets
All HUDs and widgets are configurable via the settings menu or directly in the .ini file.
HUDs
| HUD | Description |
|---|---|
| Standings | Live race positions with gaps, status, and tracked rider indicators |
| Map | Top-down track map with rider positions (click to spectate) |
| Radar | Proximity radar with approach alerts and distance arrows |
| Timing | Split and lap times with gap comparisons |
| Gap Bar | Visual gap-to-PB bar with position markers |
| Pitboard | Pitboard-style lap information display |
| Lap Log | Historical lap times with PB indicators |
| Lap Consistency | Lap time consistency analysis with trend visualization |
| Ideal Lap | Best sector times and theoretical ideal lap |
| Records | Online lap records (CBR or MXB-Ranked) with personal bests (MX Bikes only) |
| FMX | Freestyle trick detection with scoring and chain combos |
| Telemetry | Throttle, brake, suspension graphs |
| Performance | FPS and plugin CPU usage |
| Rumble | Controller rumble effect visualization |
| Session | Session info (type, format, track, server, players, password) |
Widgets
| Widget | Description |
|---|---|
| Lap | Current lap number |
| Position | Race position |
| Time | Session time/countdown |
| Speed | Speed and gear |
| Speedo | Analog speedometer |
| Tacho | Analog tachometer |
| Bars | Telemetry bars (throttle, brake, clutch, RPM, suspension, fuel) |
| Fuel | Fuel calculator with consumption tracking |
| Lean | Bike lean angle with arc gauge |
| Notices | Race status notices (wrong way, blue flag, last lap, finished) |
| Gamepad | Controller visualization |
Advanced Settings
All plugin settings are stored in mxbmrp3_settings.ini in your user data folder.
In-game vs INI-only settings:
- Most settings are configurable via the in-game settings menu
- Some power-user options are only accessible by editing the INI file directly
- INI-only settings are documented with inline comments
INI structure:
[HudName]— Base/default settings for a HUD[HudName:Practice],[HudName:Race],[HudName:Spectate]— Profile-specific overrides (only values that differ from base)
Editing the INI file:
With the game closed (recommended):
- Exit the game completely
- Edit
mxbmrp3_settings.ini - Launch the game to apply changes
Hot reload (for rapid iteration):
- Disable Auto-Save in Settings > General
- Edit the INI file while the game is running
- Use the Reload Config hotkey to apply changes (bind it in Settings > Hotkeys)
If Auto-Save is enabled, changes made to the INI while the game is running will be overwritten.
Modding
Plugin data and custom assets are stored in Documents\PiBoSo\[Game]\mxbmrp3\.
Custom Assets
Add custom fonts, textures, and icons by placing files in the appropriate subfolder:
mxbmrp3/
├── fonts/       ← Custom .fnt files
├── textures/    ← Custom .tga textures
└── icons/       ← Custom .tga icons
On game startup, the plugin syncs these files to the plugin’s data directory (plugins/mxbmrp3_data/). User files with the same name as bundled assets will override them. This keeps your customizations separate from the plugin installation, so updates won’t overwrite your files. Restart the game after adding or modifying assets.
Textures use the naming convention {element_name}_{number}.tga (e.g., standings_hud_1.tga). They’re auto-discovered and selectable via the Texture control in each HUD’s settings. Source design files (PSD) are available in assets/.
Fonts (.fnt files) are auto-discovered and assignable to categories (Title, Normal, Strong, Marker, Small) in Settings > Appearance. To generate fonts, use the fontgen utility provided by PiBoSo. See this forum post for details. An example configuration is provided in fontgen.cfg.
Icons (.tga files) are discovered alphabetically and available for tracked rider customization.
Data Files
| File | Description |
|---|---|
mxbmrp3_settings.ini |
All HUD settings (positions, visibility, options) |
mxbmrp3_personal_bests.json |
Personal best lap times per track/bike/category |
mxbmrp3_tracked_riders.json |
Tracked riders with colors and icons |
rumble_profiles.json |
Per-bike rumble effect profiles |
odometer.json |
Per-bike odometer and trip meter data |
Troubleshooting
HUD Not Appearing
- Check Installation requirements (MX Bikes Beta 20+ / GP Bikes Beta 18+)
- Verify the DLO file and
mxbmrp3_data/are in the correctplugins/folder. Games have two directories - the game installation (contains the game .exe) and user data (Documents\PiBoSo\[Game]\). Plugins go in the game installation, not Documents. - For GP Bikes, ensure you’re using
mxbmrp3_gpb.dlo, notmxbmrp3.dlo
Text or Icons Not Appearing
- Ensure
mxbmrp3_data/folder is in theplugins/folder alongside the DLO file - The
mxbmrp3_data/folder contains fonts, textures, and icons required for rendering - If you moved or renamed this folder, restore it from the release archive
Game Fails to Start or Shows Black Screen
- Try removing the plugin DLO file temporarily to verify the game starts without it
Elements Appearing Twice (Ghost/Duplicate)
- Check for duplicate DLO files - only ONE plugin DLO should exist in your plugins folder
Elements Overlapping
- Drag elements to reposition them
- Use settings menu to adjust scale
Controller or Rumble Not Working
- Verify the correct controller is selected in Settings > General
- If you accidentally deleted
xinput64.dlifrom the plugins folder, controller input may stop working - To restore: verify game files integrity (Steam) or reinstall the game
For bug reports or feature requests, open an issue on GitHub.
Development
Built with C++17, Visual Studio 2022, Piboso Plugin API, and Claude Code.
CLAUDE.md- Quick-start guide for developers and AI assistantsARCHITECTURE.md- Comprehensive technical documentation with diagrams
Building from Source
Requirements: Visual Studio 2022+, Windows SDK 10.0, Platform Toolset v143
- Clone the repository:
git clone https://github.com/thomas4f/mxbmrp3.git cd mxbmrp3 - Open
mxbmrp3.slnin Visual Studio 2022 - Select configuration:
- MXB-Release / MXB-Debug for MX Bikes
- GPB-Release / GPB-Debug for GP Bikes
- Build the solution (Ctrl+Shift+B)
- Output:
- MX Bikes:
build/MXB-Release/mxbmrp3.dlo - GP Bikes:
build/GPB-Release/mxbmrp3_gpb.dlo
- MX Bikes:
Roadmap
Ideas under consideration (no guarantees): extended telemetry (g-force), event log, HTTP data export for OBS overlays.
Licensed under the MIT License. See THIRD_PARTY_LICENSES.md for bundled asset attributions.
Feedback and contributions are welcome.