mxbmrp3
An open-source plugin for MX Bikes, GP Bikes, and Kart Racing Pro with customizable on-screen displays, immersion features, social tools, and streaming/broadcasting overlays.
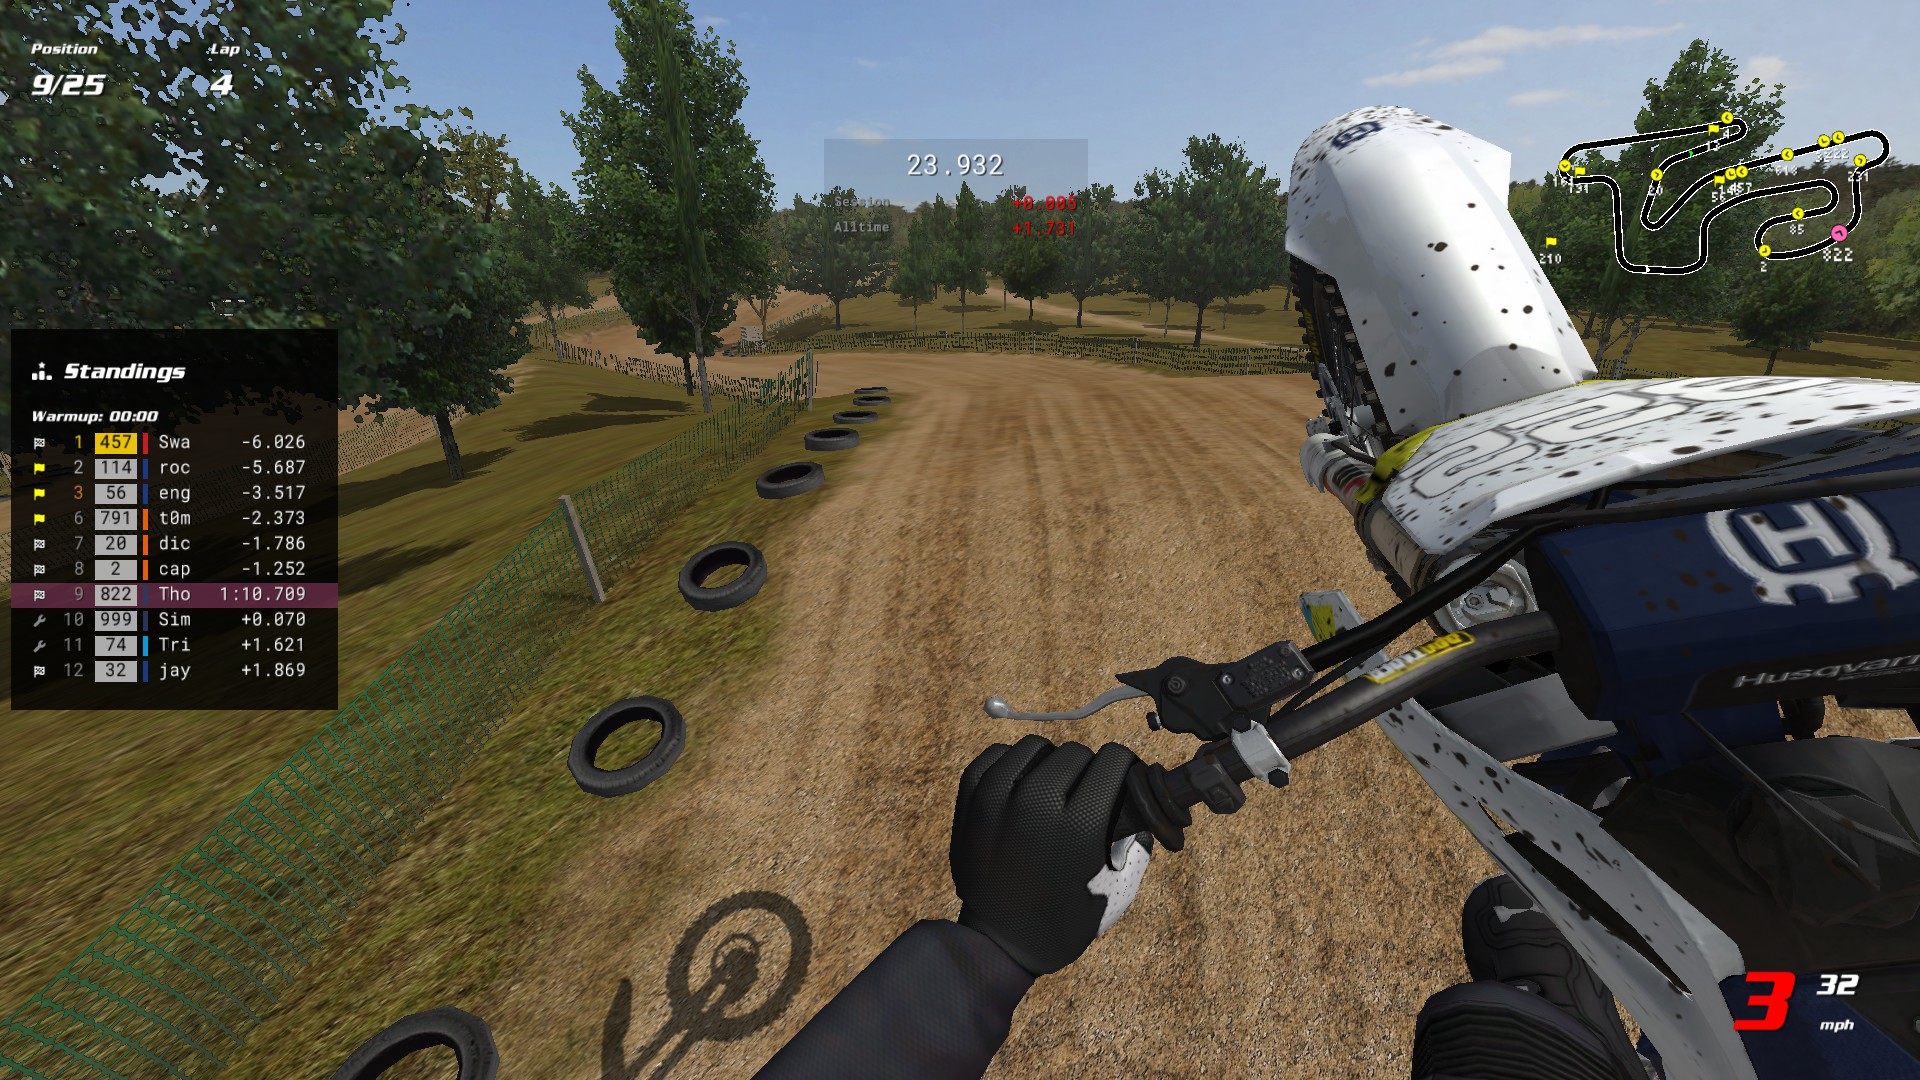 Default HUD layout. All elements are fully customizable - see Tips & Tricks for setup ideas.
Features
- Customizable HUD layouts with drag-and-drop positioning, hotkeys, color themes, and auto-switching profiles
- Live race information covering standings, timing, gap-to-PB bar, track map, radar, event log, and online records
- Telemetry and lap analysis with splits, personal bests, race-progression charts, and fuel consumption tracking
- Social features including Steam friends, Discord Rich Presence, and rider tracking with custom colors/icons
- Broadcasting features with auto-director, OBS overlay, controller visualization, and companion window
- First-person helmet overlay with telemetry-driven tilt and vibration, plus configurable controller rumble
- Persistent stats and personal bests across sessions, plus FMX freestyle trick scoring
- Modding support for custom textures, fonts, icons, web overlay theming, and INI-level configuration
Get Started
Quick Start
- Download the installer above, run it, and follow the on-screen steps. Windows may show several “unknown publisher” warnings - why & how to proceed.
- Launch the game and load a track
- Move the mouse to bring up the pointer, then right-click and drag to reposition elements
- Press Tilde (~) or click the settings button to toggle elements, adjust opacity, and more
See Installation for detailed setup instructions, or Configuration to fine-tune everything.
Contents
- Installation
- Controls
- Configuration
- HUDs & Widgets
- Web Overlay
- Tips & Tricks
- Advanced Settings
- Modding
- Troubleshooting
- Privacy
- Feedback & Issues
- Uninstallation
- Development
- License
- Acknowledgments
- Support
Installation
Requirements:
- MX Bikes beta21 or newer / GP Bikes beta22b or newer / Kart Racing Pro Release 14 or newer
Automatic Installation
- Download the latest installer
mxbmrp3-Setup.exe - Run the installer - it will:
- Auto-detect your MX Bikes, GP Bikes, and Kart Racing Pro installations (Steam or standalone)
- Let you choose which games to install for
- Install to the correct plugins folder for each game
- Handle upgrades automatically (preserves your settings)
Manual Installation
- Download the latest release archive
mxbmrp3.zip - Find your game’s plugins folder:
- Steam: Right-click the game in your library > Manage > Browse local files > open
plugins - Standalone: Navigate to your game installation folder (e.g.,
C:\Program Files\[Game]\) > openplugins
- Steam: Right-click the game in your library > Manage > Browse local files > open
- Extract the plugin files:
- Copy the DLO for your game to the
plugins\folder:mxbmrp3.dlofor MX Bikesmxbmrp3_gpb.dlofor GP Bikesmxbmrp3_krp.dlofor Kart Racing Pro
- Copy the
mxbmrp3_data\folder to theplugins\folder
Do NOT delete the existing game files (
proxy64.dlo,proxy_udp64.dlo,xinput64.dli, ortelemetry64.dlofor GP Bikes) - these are native game files, not old plugin versions.Your directory should look like this after installation (files vary slightly by game):
[Game]/ │ mxbikes.exe / gpbikes.exe / kart.exe │ ... │ └───plugins/ ├── mxbmrp3_data/ ← Add this folder (from release) │ ├── fonts/ ← Font files (.fnt) │ ├── textures/ ← Texture files (.tga) │ ├── icons/ ← Icon files (.tga) │ └── web/ ← Web overlay files (HTML/CSS/JS) ├── mxbmrp3.dlo ← Add this (MX Bikes only) ├── mxbmrp3_gpb.dlo ← Add this (GP Bikes only) ├── mxbmrp3_krp.dlo ← Add this (Kart Racing Pro only) ├── proxy_udp64.dlo ← Keep (native game file) ├── proxy64.dlo ← Keep (native game file) ├── xinput64.dli ← Keep (native game file) └── telemetry64.dlo ← Keep (GP Bikes only) - Copy the DLO for your game to the
After Installation
Launch the game and load into a track. A few elements are enabled by default, so the HUD shows up right away - from there, open the settings menu to configure everything (see Configuration). If nothing appears, see Troubleshooting.
Controls
Mouse
- Move Mouse - Show mouse pointer and settings button (auto-hides after inactivity)
- Left Click - Interact with settings menu and HUD elements
- Right Click & Drag - Reposition elements
Keyboard Shortcuts
Keyboard and controller hotkeys can be customized in Settings > Hotkeys. By default, only the settings menu hotkey is configured:
- Tilde (~) - Toggle settings menu
Configuration
The plugin is active in-game only - it does nothing in the main menus, so all configuration happens on track.
Use the settings menu (Tilde or the settings button in the top-right) to configure all HUDs and widgets. Hover over any setting to see its description - all controls have in-game tooltips explaining their function.
With Auto-Save on (the default), changes are saved automatically when you leave the track, so configuring HUDs never causes a stutter. You can also save at any time with the Save button at the bottom of the settings menu, which lights up whenever you have unsaved changes.
The settings menu provides global settings that apply to all profiles, followed by per-element tabs for the individual HUDs and widgets:
| Icon | Tab | Description |
|---|---|---|
| General | Profiles, preferences, web overlay, presence integrations, usage analytics (see privacy) | |
| Appearance | Display units/format, fonts, color theme, and HUD placement (grid snap, clamp) | |
| Hotkeys | Keyboard and controller bindings | |
| Riders | Track specific riders with custom colors and icons | |
| Rumble | Controller vibration feedback effects | |
| Helmet | First-person helmet overlay configuration | |
| Director | Auto-director for spectating and replays - automatically follows the most interesting rider | |
| Updates | Check for new versions and install updates in-game |
Plus a tab for each individual HUD and Widget, for per-element visibility, scale, opacity, and options.
Profiles
Four separate profiles store complete HUD layout configurations:
- Practice - Practice and warmup sessions
- Qualify - Pre-qualify, qualify practice, and qualify sessions
- Race - Race 1, Race 2, Straight Rhythm sessions
- Spectate - Spectating or viewing replays
Auto-switch (disabled by default) automatically changes profiles based on session type.
HUDs & Widgets
HUDs are the larger data displays - each gets its own settings tab with options like column/row toggles, gap modes, and textures. Widgets are simpler, single-purpose readouts (one number, gauge, or dial) with just position, scale, and opacity; rather than a tab each, they’re all configured together under the shared Widgets tab.
HUDs
| Icon | HUD | Description |
|---|---|---|
| Standings | Live race positions with gaps, status, and tracked rider indicators | |
| Map | Top-down track map with rider positions (click to spectate) | |
| Radar | Proximity radar with approach alerts and distance arrows | |
| Lap Log | Historical lap times with PB indicators | |
| Ideal Lap | Best sector times and theoretical ideal lap | |
| Charts | Session-progression charts: position, race trace, gap to leader, pace | |
| Telemetry | Throttle, brake, suspension graphs | |
| Records | Online lap records (CBR or MXB-Ranked) with personal bests (MX Bikes only) | |
| Friends | Steam friends in-game: their server/track and who’s joined your session | |
| Pitboard | Pitboard-style lap information display | |
| Session | Session info (type, track, format, server, weather) | |
| Timing | Split and lap times with gap comparisons | |
| Gap Bar | Visual gap-to-PB bar with position markers | |
| Notices | Race status notices (wrong way, blue flag, PB alerts, last lap, finished) | |
| Event Log | Timestamped feed of race events (laps, penalties, finishes, pit activity) | |
| FMX | Freestyle trick detection with scoring and chain combos (MX Bikes and GP Bikes only) | |
| Stats | Riding stats with columns for last lap, session, and all-time totals | |
| Performance | FPS and plugin CPU usage |
Widgets
| Widget | Description |
|---|---|
| Position | Race position |
| Lap | Current lap number |
| Time | Session time/countdown |
| Clock | Real-time clock |
| Gear | Current gear |
| Speed | Current speed |
| Bars | Vertical telemetry bars (throttle, brake, suspension, etc.) |
| Lean | Bike lean angle with arc gauge |
| G-Force | Lateral/longitudinal G-force gauge with peak marker |
| Fuel | Fuel calculator with consumption tracking |
| Speedo | Analog speedometer |
| Tacho | Analog tachometer |
| Compass | Heading dial (classic needle or modern rotating card) |
| Gamepad | Controller visualization |
| Tyre Temp | Front and rear tyre temperatures (GP Bikes only) |
| ECU | Engine map, traction control, engine braking and anti-wheeling (GP Bikes only) |
Web Overlay
The plugin includes a built-in HTTP server that streams live race data to a browser-based overlay. It’s designed for use as an OBS Browser Source, but works just as well opened directly in a browser.
Setup
- Enable the web server in Settings > General > Web Server (the port number is shown when active)
- In OBS, add a Browser Source with URL
http://localhost:8080(default port - use the port shown in step 1 if changed) - Set width/height to match your stream resolution (e.g., 1920x1080)
- The overlay auto-connects and displays a standings tower, event log, rider focus card, and periodic broadcast panels (fastest-lap boards, a “down the order” rundown, and on-track battles)
Settings Panel
The overlay includes a built-in settings panel for configuring display options:
- In OBS, right-click the Browser Source and select Interact to get mouse access
- Move your mouse to reveal a gear icon in the top-right corner, then click to open the panel
- Configure compact times, tower size, event/chip filters, focus card, font size, and more
- Drag the header bar to reposition the tower
- All settings are saved to the browser’s localStorage and persist across reloads
Colors and fonts sync automatically from your in-game settings. To customize the overlay’s HTML, CSS, or JS, see Modding > Web Overlay Files.
Tips & Tricks
Track records
The Records HUD fetches online lap records from CBR or MXB-Ranked. Enable “Auto-fetch” in Settings > Records to automatically load records when you enter a track. Records also work while spectating.
Custom segment timing (training tool)
Bind the Segment Add and Segment Remove hotkeys (Settings > Hotkeys, unbound by default) to drop timing points on the track as you ride. Drop two and the Timing HUD times the section between them - live, with a delta to your best for it - so you can drill a single corner or rhythm section without completing a full lap. Remove the points to return to normal split/lap timing.
Auto-director (spectating & replays)
Enable the Director (Settings > Director, or click its camera-icon status button) and it automatically cuts the spectate camera to the most interesting rider or battle, broadcast-style, so you don’t have to switch riders by hand. It works while spectating live and in replays - a great way to re-watch or record a session and let it direct the action for you. It’s off by default (so it never overrides your manual camera unasked), and it also drives the Web Overlay’s battle panel.
Click-to-spectate
Left-click on any rider on the Map HUD or Standings HUD to switch the spectate camera to that rider.
Streaming setup
Enable the Session HUD (Settings > Session) to show the server name, track, and session format on screen for your viewers. The Pitboard and Gamepad widgets also work well on stream - both have fully customizable textures, and the Gamepad widget shows your live controller inputs. Pair with Discord Rich Presence (Settings > General) to show your current session and track in your Discord profile. For a broadcast-style overlay, see Web Overlay.
Second-monitor HUD (Companion window)
Set Settings > Appearance > HUD Display to Companion (or Both) to open a standalone window you can drag and maximize on a second monitor. Each HUD keeps its own on/off state and position there (drag or toggle it while your mouse is over that window), so you can run a minimal in-game layout and a full dashboard on the second screen at once. It needs no browser or OBS - for a streamable browser source instead, see Web Overlay.
See where friends are racing
Enable Steam Friends (Settings > General) to broadcast your session to friends and populate the Friends HUD: which of your Steam friends are in-game, the server and track they’re on, and who’s joined your session.
Power-user INI tweaks
Many additional options are available by editing the INI file directly. The file is well-commented and organized by HUD section. Each HUD section also supports per-element color and font overrides. Colors use ABGR hex values; fonts use the font filename (without .fnt) of any file in the fonts/ folder. For example:
[StandingsHud]
classicLayout=1            ; remove number plates and brand color strips

[SpeedWidget]
color_primary=0xff00ff00   ; green text (ABGR format)
font_title=RobotoMono-Bold ; Roboto Mono Bold font
Use the Color Override Picker to convert RGB colors to ABGR format. See Advanced Settings for how to edit and hot-reload the INI file.
Getting the most FPS
Turn down the map’s Detail, slim or disable its Track outline, and hide HUDs you don’t use. Beyond that, take stock of your plugins folder: every installed plugin does work on every frame whether you use it or not, and some cost far more than others. Removing plugins you don’t need is often the biggest FPS win of all.
Experimental: run the plugin on its own thread
By default the plugin does its work during the game’s frame. Set pluginThread=1 in the [Advanced] section of the INI file to move the plugin’s HUD building and event handling onto a separate thread, so a heavy HUD rebuild can’t cost you frames. It’s off by default and experimental - try it if you’re chasing the smoothest possible frame times. Toggle it live with the Reload Config hotkey.
The next three are game settings, not plugin settings - listed here because they pair well with the plugin’s HUDs:
Remove the stock pitboard
Create an empty file called pitboard.cfg in [Game]\misc\hud\ (create the directories if needed). This removes the default 2D pitboard while keeping the small 3D pitboard in the game world. Delete the file to restore it.
Show/hide the rider stand icon
Enable it under Simulation > “Show Rider Stand”. To customize the icon or its position, extract rider.cfg and riderstand.tga from misc.pkz\misc\helpers\ to [Game]\misc\helpers\ and edit them there.
Show/hide the game’s native gear indicator
Toggle it under Simulation > “Show HUD”. Disable it if you’d rather use the plugin’s GearWidget instead. To customize the graphics or position, extract gear.tga, hud.cfg, LCD.fnt, and switch.tga from misc.pkz\misc\hud\ to [Game]\misc\hud\ and edit them there.
Advanced Settings
All plugin settings are stored in mxbmrp3_settings.ini in your user data folder.
In-game vs INI-only settings:
- Most settings are configurable via the in-game settings menu
- Some power-user options are only accessible by editing the INI file directly
- INI-only settings are documented with inline comments
INI structure:
[HudName]- Base/default settings for a HUD[HudName:Practice],[HudName:Qualify],[HudName:Race],[HudName:Spectate]- Profile-specific overrides (only values that differ from base)
Editing the INI file:
With the game closed (recommended):
- Exit the game completely
- Edit
mxbmrp3_settings.ini - Launch the game to apply changes
Hot reload (for rapid iteration):
- Disable Auto-Save in Settings > General
- Edit the INI file while the game is running
- Use the Reload Config hotkey to apply changes (bind it in Settings > Hotkeys)
If Auto-Save is enabled, your in-game state is written back when you leave the track, overwriting any manual edits you made to the INI during that session - so disable Auto-Save first for hot reload.
Modding
To customize MXBMRP3, place your files in Documents\PiBoSo\[Game]\mxbmrp3\. This is separate from the plugin install folder ([Game]\plugins\mxbmrp3_data\), so your customizations are preserved across plugin updates. Do not edit the bundled files in [Game]\plugins\mxbmrp3_data\ directly - they will be overwritten on update (with the exception noted for custom.css below).
Custom Assets
Add custom fonts, textures, and icons by placing them in the appropriate subfolder:
mxbmrp3/
├── fonts/       ← Custom .fnt files
├── textures/    ← Custom .tga textures
├── icons/       ← Custom .tga icons
└── web/
    └── logos/   ← Sponsor/logo PNGs for the web overlay slideshow
On game startup, the plugin syncs these files to the plugin’s data directory ([Game]\plugins\mxbmrp3_data\). User files with the same name as bundled assets will override them. Restart the game after adding or modifying assets.
Custom Textures
Textures use the naming convention {element_name}_{number}.tga (e.g., pitboard_hud_2.tga). Drop them into the textures\ subfolder and they’re auto-discovered and selectable via the Texture control in each HUD’s settings.
Gamepad - The Gamepad widget ships with Xbox and PlayStation layouts. To customize them, copy gamepad_widget_1.tga (Xbox) or gamepad_widget_2.tga (PlayStation) from [Game]\plugins\mxbmrp3_data\textures\ to the textures\ subfolder and edit them. Source design files (PSD) are available in assets/.
Helmet - The helmet overlay uses two textures: helmet_upper_1.tga (visor rim/top) and helmet_lower_1.tga (chin bar). Author at screen resolution with transparent visor openings and ~10% bleed on all sides (extra opaque border beyond the visible area) so tilt and vibration don’t expose hard edges.
Custom Fonts
Fonts (.fnt files) are auto-discovered and assignable to categories (Title, Normal, Strong, Marker, Small) in Settings > Appearance. To generate fonts, use the fontgen utility provided by PiBoSo. See this forum post for details. An example configuration is provided in fontgen.cfg.
Custom Icons
Icons (.tga files) placed in the icons\ subfolder are discovered alphabetically and available for tracked rider customization in Settings > Riders.
Web Overlay Files
The overlay files are plain HTML, CSS, and JS. To customize them, place modified files in Documents\PiBoSo\[Game]\mxbmrp3\web\ - user files override the bundled versions on startup and are preserved across updates.
style.css- The:rootblock holds the theme tokens: colors, fonts, sizes, spacing, and animation timings. Colors and fonts sync from the game (to override those incustom.css, add!important); sizes, spacing, and animations can be set directly.custom.css- Optional file you create yourself for style overrides. Copy the bundledcustom-sample.csstocustom.cssto start - it’s a commented reference with ready-made recipes (light theme, compact, no-motion, fonts). Loaded afterstyle.css, so its rules take precedence. Use it for small theme tweaks instead of forking the full stylesheet. Tip: append?demoto the overlay URL to preview your theme against a synthetic race without launching the game.index.html- Overlay structureoverlay-config.js- TheCONFIGblock at the top defines defaults for all settings. These are overridden by the settings panel (stored in localStorage).
Data Files
| File | Description |
|---|---|
mxbmrp3_settings.ini |
All HUD settings (positions, visibility, options) |
mxbmrp3_tracked_riders.json |
Tracked riders with colors and icons |
mxbmrp3_rumble_profiles.json |
Per-bike rumble effect profiles |
mxbmrp3_stats.json |
Unified stats, personal bests, and odometer data |
mxbmrp3_analytics.json |
Anonymous random install ID for usage analytics (see Privacy) |
Troubleshooting
Windows Warns Me When Downloading or Installing
The installer isn’t code-signed yet, so Windows may show one or more “unknown publisher” / “not commonly downloaded” warnings. These are reputation warnings about the unsigned installer and its low download count, not a malware detection. Depending on your browser you may see up to three, in this order:
- Downloading (browser): “isn’t commonly downloaded.” In Microsoft Edge: open Downloads, click the
...next to the file, then Keep > Show more > Keep anyway (Chrome is similar). - Running the installer (Windows SmartScreen): a blue “Windows protected your PC” box - click More info > Run anyway.
- Installing (User Account Control): “…app from an unknown publisher…“ - click Yes. Admin is required because the plugin is copied into the game’s
plugins\folder underProgram Files.
Installing manually from the ZIP archive avoids most of these, since there’s no installer to run. If you’d like to check the download anyway, you can scan it on VirusTotal.
The long-term fix is a code-signing certificate (a paid yearly cost, and one of the things donations would go toward). Until that’s in place, the steps above are all that’s needed.
Make Sure You’re on the Latest Version
- Many issues are already fixed in a newer release, so update before troubleshooting further
- Check your version in Settings > Updates (or the Version widget). The plugin notifies you on startup when a new stable release is available
- To update in-game, go to Settings > Updates and install directly - no manual download or reinstall needed
- If the in-game updater is set to “Off” or unavailable, download the latest release manually from GitHub Releases and reinstall
HUD Not Appearing
- Check the Installation requirements for your game’s minimum version
- Verify the DLO file and
mxbmrp3_data\are in the correctplugins\folder. Games have two directories - the game installation (contains the game .exe) and user data (Documents\PiBoSo\[Game]\). Plugins go in the game installation, not Documents. - Use the correct DLO for your game:
mxbmrp3.dlo(MX Bikes),mxbmrp3_gpb.dlo(GP Bikes), ormxbmrp3_krp.dlo(Kart Racing Pro)
Installer Detected the Wrong Game Directory
- If you have multiple installations (e.g., standalone and Steam), the installer may pick the wrong one. Verify the plugin ended up in the
plugins\folder next to the game.exeyou actually launch. If not, run the installer again and select the correct path, or install manually.
Text or Icons Not Appearing
- Ensure
mxbmrp3_data\folder is in theplugins\folder alongside the DLO file (see directory structure) - The
mxbmrp3_data\folder contains fonts, textures, and icons required for rendering - If you moved or renamed this folder, restore it from the release archive
Gamepad Widget Appears Cut Off
- Go to Settings > Widgets tab and click “Reset Widgets” to correct the button positions.
Elements Appearing Twice (Ghost/Duplicate)
- Check for duplicate MXBMRP3 DLO files - only one of
mxbmrp3.dlo(MX Bikes),mxbmrp3_gpb.dlo(GP Bikes), ormxbmrp3_krp.dlo(Kart Racing Pro) should exist in your plugins folder. Other plugins’ DLO files are fine.
Elements Overlapping
- Drag elements to reposition them
- Use settings menu to adjust scale
Controller or Rumble Not Working
- Verify the correct controller is selected in Settings > General
- If you accidentally deleted
xinput64.dlifrom the plugins folder, controller input may stop working - To restore: verify game files integrity (Steam) or reinstall the game
Web Overlay Not Working
- If the settings show “Error” and “Port … may be in use”, another application is using the same port
- Change the port in Settings > General > Web Server Port (e.g., to 8081)
- Remember to update your OBS Browser Source URL to match the new port
Game Fails to Launch, Crashes, or Shows Black Screen
- See the MX Bikes Troubleshooting Guide for general game issues (crashes, mods, plugins, RAM, controllers)
- If the Windows Event Log shows
mxbmrp3.dloas the faulting module, see Feedback & Issues
Privacy
The plugin sends a small anonymous usage ping per game launch, so the developer can gauge how many people actively use it. It is on by default and you can opt out anytime in Settings > General > Integrations (the “Analytics” toggle). Turning it off sends one final anonymous opt-out ping, then nothing more.
What it sends:
| Data | Details |
|---|---|
| Install ID | A random UUID made on your machine (stored in mxbmrp3_analytics.json), not tied to your name, account, hardware, or IP. Delete the file to reset it. |
| Version & game | The plugin version and game, and whether this launch is a fresh install or an upgrade |
| Enabled features | HUDs, widgets, web overlay, Discord, Steam, rumble, update channel, and so on, as anonymous on/off flags |
| Environment | Operating system and version/build (e.g. Windows 11 22631, or Wine/Proton on Linux), language, and whether it’s the Steam or standalone build |
| Usage counters | How many times this install has launched, and how many days since it was first installed |
| Session length | How long a play session lasted (start to clean exit), so the developer can gauge typical usage |
| Crashes | If the game crashed last session: which module faulted and where, the error code and access type (read/write/execute), the plugin and game versions at the time, and a short backtrace of the faulting call stack (the top several module-and-offset frames, so a plugin fault can be told apart from a bystander to a game or driver crash) - enough to group similar crashes, but never the memory dump or its contents. Reported on the next launch |
| Link clicks | Which in-plugin link you click (docs, community, or support/donate) - nothing else |
What it does not send: no names, no in-game/online activity, no telemetry, no lap times, no server or rider data, and no crash dump or log (those stay on your machine) - nothing identifying. The pings are fire-and-forget and never affect performance.
Analytics are processed by two open-source services: Aptabase handles the detailed events above, and GoatCounter receives a single per-launch hit as an aggregate headcount. Both are covered by the one Analytics toggle.
When analytics is on, the plugin may also fetch a small config file from this repository that can only ever reduce what’s sent, never add to it. Turning the Analytics toggle off stops this too.
Feedback & Issues
Bug reports, feature requests, and questions are all welcome. Open an issue on GitHub or leave a comment on MXB-Mods.
A short description of what you were doing when the issue happened (track, session type, bike, and any reproduction steps) helps a lot.
For crashes, please attach both files from Documents\PiBoSo\[Game]\mxbmrp3\crashes\ - the plugin writes them automatically whenever it catches an unhandled fault. (The plugin catches any crash in the game, so these are usually faults in the game itself, not plugin bugs.)
Before reporting, check Known MX Bikes Crashes — it lists game-engine crashes the plugin’s crash handler has caught, with Event Viewer fault offsets you can match against yours. If your crash is listed, it’s a known game bug with no plugin fix possible.
mxbmrp3_crash_<timestamp>_<pid>.dmp- the minidump (state at the moment of crash)mxbmrp3_crash_<timestamp>_<pid>.log- a snapshot of the plugin log captured at crash time
Grab the matching pair (same timestamp/pid) for the crash you want to report.
Uninstallation
Automatic Uninstallation
If you used the installer, remove the plugin like any other Windows app: open Settings > Apps > Installed apps (or Control Panel > Programs and Features), find MXBMRP3, and choose Uninstall. You can also run mxbmrp3_uninstall.exe directly from any game’s plugins\ folder. The uninstaller lets you pick which games to remove from, then deletes the plugin DLO, the mxbmrp3_data\ folder, and the registry entry.
Manual Uninstallation
If you installed from the ZIP, delete the files you added from each game’s plugins\ folder:
- the plugin DLO (
mxbmrp3.dlo,mxbmrp3_gpb.dlo, ormxbmrp3_krp.dlo) - the
mxbmrp3_data\folder
Leave the native game files in place (proxy64.dlo, proxy_udp64.dlo, xinput64.dli, and telemetry64.dlo for GP Bikes). These are native game files, not part of the plugin.
Settings & Data
Both methods leave your settings, profiles, and stats untouched, so an upgrade or reinstall keeps them. To remove them as well, delete the per-game folder:
Documents\PiBoSo\[Game]\mxbmrp3\
Development
Built with C++17, Visual Studio 2022, the PiBoSo Plugin API, and Claude Code.
DEVELOPMENT.md- building (Windows shipping build + Linux cross-build) and running the test suitesTESTING.md- the layered test suite (unit / integration / specialized) and how to add a testARCHITECTURE.md- full technical documentation with diagramsCLAUDE.md- quick-start context for developers and AI assistants
Quick start: clone, open mxbmrp3.sln in Visual Studio 2022 (x64), and build. The full configuration table, the Linux cross-build, and the unit/integration tests are documented in DEVELOPMENT.md.
License
Licensed under the MIT License. See THIRD_PARTY_LICENSES.md for bundled asset attributions.
Acknowledgments
- bh5o - Pitboard texture
- Husk - Gamepad widget source design files
- HornetMaX - MaxHUD, which served the MX Bikes community for over a decade
Thanks to everyone in the MX Bikes community who tested, reported bugs, and shared ideas.
Support
MXBMRP3 is free and open-source, and will stay that way. If it’s added something to your time in the game and you’d like to chip in toward continued development, you can do so here:
No perks, no priority, no expectations. Just appreciated.